Showing posts with label linux. Show all posts

Apr 27, 2014

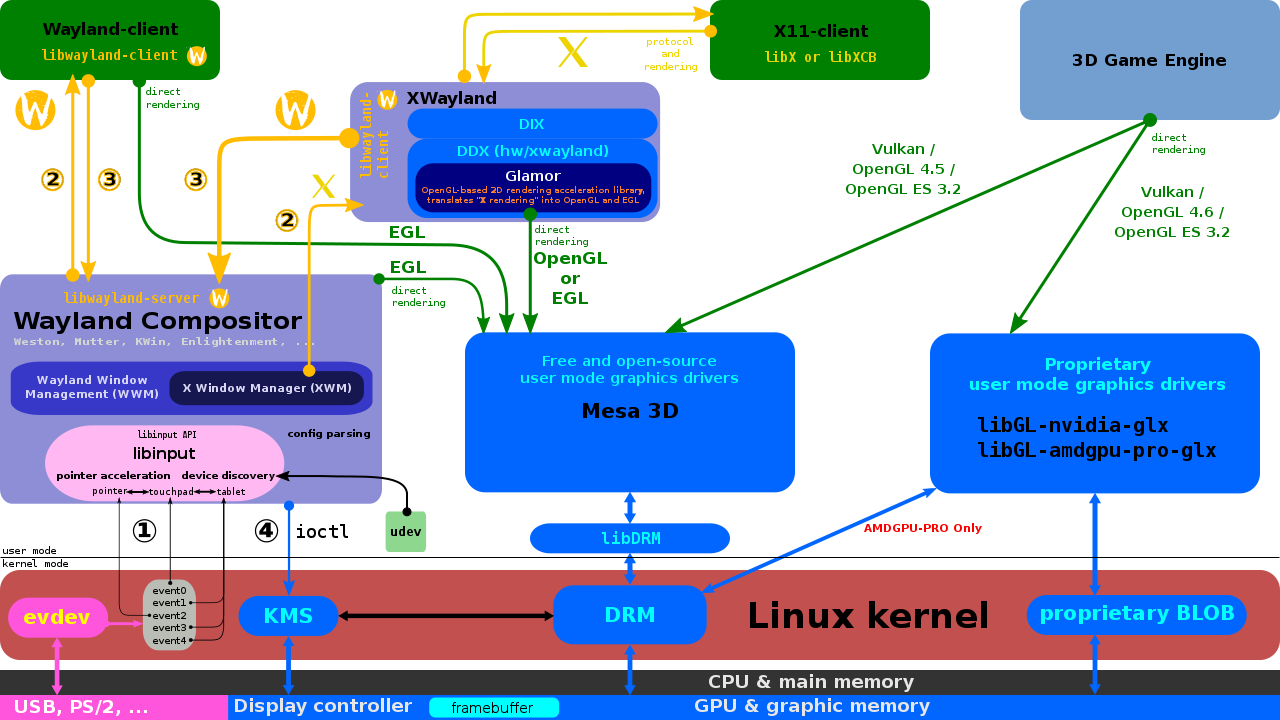
The Linux Graphics Stack


The Direct Rendering Manager (DRM) is a device-independent kernel-level device driver that provides support for the Direct Rendering Infrastructure.

Direct Rendering Infrastructure (DRI) is an interface and a free software implementation inside the kernel used by the X Window System/Wayland to securely allow user applications to access the video hardware without requiring data to be passed through the display server. Its primary application is to provide hardware acceleration for the Mesa implementation of OpenGL, which is the core of the DRI OpenGL drivers. Without DRI, programs have to use the CPU while rendering (indirect rendering), which degrades overall performance. DRI has also been adapted to provide OpenGL acceleration on a framebuffer console without a display server running.

Mode setting (KMS) is a software operation that activates a display mode (screen resolution, color depth, and refresh rate) for a computer's display adapter.

Wayland is a protocol that specifies the communication between the display server (called Wayland compositor) and its clients. It was initially designed as a replacement for the X Window System. In stark contrast to the latter, Wayland clients will render without detour directly into their own buffer located in the graphics memory, through the use of EGL with some additional Wayland-specific extensions to EGL.
The display manager is to do the compositing, hence it will incorporate a big chunk of the functionality of current-day compositing window managers. It will composite those buffers to form the on-screen display of application windows. The Wayland protocol is essentially only about input handling and buffer management. The handling of the input hardware relies on evdev in Linux, and similar components in other operating systems.

EGL is an interface between Khronos rendering APIs (such as OpenGL, OpenGL ES or OpenVG) and the underlying native platform windowing system. EGL handles graphics context management, surface/buffer binding, rendering synchronization, and enables "high-performance, accelerated, mixed-mode 2D and 3D rendering using other Khronos APIs." EGL is managed by the non-profit technology consortium Khronos Group.

evdev (for event device) is a component of the Linux kernel for handling input (from keyboards, mice, joysticks, etc.) and a closely related input driver for both the X.Org Server and Wayland compositors. The kernel component is glue code which translates input events from peripheral-specific drivers into a generic structure which the input driver can easily translate into X11 events. Thus every input device with a Linux driver is compatible with the X.Org input driver, making X.Org much easier to configure.

Mesa is a collection of free and open-source libraries that implement OpenGL and several other APIs related to hardware-accelerated 3D rendering, 3D computer graphics and GPGPU.

Mar 4, 2013

Linux From Scratch Book

Linux From Scratch (LFS) is a project that provides you with step-by-step instructions for building your own customized Linux system entirely from source.

http://www.linuxfromscratch.org/lfs/
http://www.linuxfromscratch.org/lfs/downloads/stable/

Sep 13, 2012

How do I lock the screen from a terminal?

gnome-screensaver-command --lock

-l, --lock                 Tells the running screensaver process to lock the screen immediately
-a, --activate             Turn the screensaver on (blank the screen)

May 21, 2012

Services, kernel modules

Use service --status-all to see what's running on your system, and service service-name stop to shut it down.

Use lsmod to see what kernel modules are loaded, and rmmod module-name to unload it.

Feb 18, 2012

Linux Filesystem Hierarchy Standard


Linux distributions use the FHS: http://www.pathname.com/fhs/pub/fhs-2.3.html http://ru.wikipedia.org/wiki/FHS

You can also try man hier.

I'll try to sum up answers your questions off the top of my head, but I strongly suggest that you read through the FHS:
  • /bin is for non-superuser system binaries
  • /sbin is for superuser (root) system binaries
  • /usr/bin & /usr/sbin are for non-critical shared non-superuser or superuser binaries, respectively
  • /mnt is for temporarily mounting a partition
  • /media is for mounting many removable media at once
  • /dev contains your system device files; it's a long story :)
  • The /usr folder, and its subfolders, can be shared with other systems, so that they will have access to the same programs/files installed in one place. Since /usr is typically on a separate filesystem, it doesn't contain binaries that are necessary to bring the system online.
  • /root is separate because it may be necessary to bring the system online without mounting other directories which may be on separate partitions/hard drives/servers
  • Yes, /etc stands for "et cetera". Configuration files for the local system are stored there.
  • /opt is a place where you can install programs that you download/compile. That way you can keep them separate from the rest of the system, with all of the files in one place.
  • /proc contains information about the kernel and running processes
  • /var contains variable size files like logs, mail, webpages, etc.
To access a system, you generally don't need /var, /opt, /usr, /home; some of potentially largest directories on a system.
One of my favorites, which some people don't use, is /srv. It's for data that is being hosted via services like http/ftp/samba. I've see /var used for this a lot, which isn't really its purpose.

Sep 1, 2011

Unix as IDE. Сетевые утилиты

netstat

Показывает сетевые соединения (входящие/исходящие), таблицу маршрутизации, статистику по сетевым интерфейсам и т.д.
netstat -at # Список всех открытых портов (TCP)
netstat -au # Список всех открытых портов (UDP)
netstat -nagrep 22 # Список открытых хостов по порту
netstat -lt # Список только прослушиваемых портов (TCP)
netstat -s # Статистика по всем открытым портам
# Подробное отображение списка с открытыми портами - добавлен PID и имя процессов
netstat -p 
# Команда для просмотра открытых TCP/UDP портов с именами процессов
# (может понадобиться root-доступ)
netstat -ltupn 
# Список подключенных хостов
netstat -lantp | grep ESTABLISHED |awk '{print $5}' | awk -F: '{print $1}' | sort -u

ss

Позволяет просматривать информацию об используемых сокетах в системе. Эта команда обладает схожим функционалом c netstat, но есть и уникальные возможности. Например возможность фильтровать вывод по установленным соединениям с определенным портом.
ss -p  # Список процессов, использующие соединения в данный момент
ss -l # Список сокетов в режиме прослушивания
 # Пример фильтра - список всех соединений к порту 80
ss -o state established '( dport = :www or sport = :www )'

lsof

Отображает процессы, которые работают с определенным файлом или сокетом.
lsof -i # Список всех сетевых соединений
lsof -i :80 # Список процессов, работающих с портом 80

netcat

Позволяет передавать/принимать данные через TCP/UDP соединения.
# Передача файла
nc -l 1234 > file # На принимающей стороне
nc localhost 1234 < file # На отправляющей стороне

# Или отдавать файл любому подключившемуся
nc -l 1234 < file # На передающей стороне
nc localhost 1234 > file # На принимающей стороне

nmap

Cканирует IP-сети с любым количеством объектов, определяет состояние объектов сканируемой сети (портов и соответствующих им служб).
Для работы большинства возможностей nmap требуется права root. Разработчики nmap предлагают хост scanme.nmap.org для тестового сканирования.
# Получение информации об портах удаленного хоста и определение операционной системы
sudo nmap -sS -P0 -sV -O scanme.nmap.org 
# scanme.nmap.org – сканируемый хост, может быть: IP, имя хоста или подсеть
# -sS – TCP SYN сканирование (полуоткрытое)
# -P0 – отключение ICMP сканирования
# -sV – определение сервисов, запущенных на открытых портах
# -O – определение версии операционной системы

# Пингование диапазона адресов
sudo nmap -sP -v "192.168.1.*" 
sudo nmap -sP -v 192.168.1.0/24
sudo nmap -sP -v 192.168.1.1-20
# -sP - ping-сканирование

sudo nmap -sT -p 22 scanme.nmap.org # Проверка одного порта
sudo nmap -sT -p 20-110 scanme.nmap.org # Проверка диапазона портов
# -sT - TCP-сканирование

sudo nmap -sS scanme.nmap.org -D 8.8.8.8 # Cкрыть свой IP адрес

nmap localhost # Определения открытых портов на локальной машине нужно выполнить

fuser

Принудительное закрытие определенного порта
fuser -k 80/tcp

DNS lookup

http://greendail.ru/node/474
dig  www.podkova.by  +trace

nslookup podkova.by
# or using google ns server
nslookup podkova.by 8.8.8.8

tshark

You can use the specific HTTP header display filters to show either just the request headers, just the response headers or both.
tshark tcp port 80 -V -R "http.request || http.response"

curl

curl \
  -s -u <USER>:<API_TOKEN> \
  -d '{ "id": "ce9d27f8", "method": "getContact", "params": [77777] }' \
  https://app01.nutshell.com/api/v1/json | python -m json.tool

# with Headers
curl -H 'Authorization: OAuth <SECURE_TOKEN>' https://blabla.com/api/?var=foo

# GET request (-G) with data (-d)
curl -G \
  -d 'access_token=77777777777777777777' \
  -d 'page=1' \ 
  -d 'per_page=1' \
  https://api.nimble.com/api/v1/contacts/list
How to test request to django-tastypie API using ApiKey:
curl \
  -H 'Authorization: ApiKey someusername:83a82c7941f6dba06510541c71505c71a0625741' \
  -H 'Content-Type:application/json' \
  -X PATCH -d '{"first_name" : "bob","last_name" : "marley"}' \
  http://127.0.0.1:8000/api/profile/

Aug 31, 2011

SSH aliases

Чтобы заходить на сервер при помощи простой комманды ssh somealias в ~/.ssh/config прописывается:
Host somealias
  HostName 11.111.11.111 
  User root

Еще удобно сгенерировать ключ

Jun 22, 2011

Изменение размеров всех фото в папке

#!/bin/bash
for f in *.JPG
do
  NEWNAME=`basename ${f} .JPG`_OK.jpg
  echo $NEWNAME
  convert -resize '1024!x768' $f $NEWNAME
done

Jun 20, 2011

Media

Videos

ffmpeg -i input.mpg -ar 22050 -ab 64 -f flv -s 320x240 -r 29.970 -b 1000k -y output.flv

-ar -- is the Audio sample rate ie, 11050, 22050, 44144, and 48000
-ab -- is the Audio Bitrate ie, 64Kbits, 128Kbits, 384Kbtis, etc.
-r ---- is the Frame Rate or fps of the finished video, ie 24, 25, 29.970 etc.
-b ---- is the Bitrate you want to set the flv video to ie, 360k, 1000k etc.

# better
mencoder input.mpeg -ovc lavc -lavcopts vcodec=mpeg4:mbd=2:trell -oac copy -vf scale=360:240 -o output.avi

# worse
ffmpeg -i input.avi -b 1000 -s 640x480 -vcodec mpeg4 -r 30000/1001 output.avi

# or
ffmpeg -i M2U00009.MPG  -ar 44100 -ab 128k -s 720:480 -padtop 46 -padbottom 50 -padcolor 000000 -ss 00:00:40 -t 00:02:55  -f mp4 grok3.avi

# for android
https://help.ubuntu.com/community/AndroidVideoEncoding

Images

convert -resize '320x240!' 002.jpg thmb_002.jpg

Screenshot

sudo apt-get install scrot
scrot
# or
sleep 10 && scrot
# or
scrot -e 'mv $f /your/pictures'

SSH без пароля

Сначала генерируется ключ:
ssh-keygen 
chmod 644 ~/.ssh/id_rsa.pub
ssh-agent bash
ssh-add
Затем он копируется на сервер:
cd ~/.ssh/ && ssh-copy-id -i id_rsa serveruser@host

Так же удобно прописать алиасы